 By
By 

If you have ever tried to change your location on a Mac, you probably noticed that macOS has no single switch labeled "Location". Open Apple Maps, and a blue dot locks onto your current street. Open a streaming website, and it assigns you to a city based on your public IP. Open System Settings, and you will find an Apple feature named "Network Locations" that has nothing to do with maps at all.
Because macOS uses different mechanisms for geographic positioning, web traffic, and account regions, changing one does not automatically update the others. Connecting to a VPN will change the country a website sees, but Apple Maps can still pinpoint your real desk. Updating your system region formats your dates and currency, but it leaves your App Store catalog locked to your billing country. This guide walks through each distinct location layer on a Mac, explains why desktop Macs often guess the wrong city, and shows how to get the exact result you need.
Why Your Mac Shows the Wrong Location
Unlike an iPhone or cellular iPad, no Mac contains a built-in GPS receiver or cellular modem. A MacBook or Mac mini cannot communicate directly with navigation satellites orbiting Earth.
Instead, macOS relies on an architecture within its Core Location framework that infers your geographic position using two primary data sources.
How Location Services on Mac Read Nearby Wi-Fi
When Location Services are enabled, your Mac's Wi-Fi card quietly scans nearby wireless routers and access points, recording their signal strength and unique hardware MAC addresses (BSSIDs). It does not need to connect to or log into these networks; it merely listens for their broadcast beacons.
macOS transmits this anonymous list of nearby BSSIDs to Apple's crowd-sourced location database. Because millions of GPS-enabled iPhones continuously map surrounding Wi-Fi networks as they move through the real world, Apple can cross-reference the beacons detected by your Mac and calculate your physical coordinates through trilateration, often achieving accuracy within 20 to 50 feet.
Why a Mac on Ethernet Shows the Wrong City
The absence of GPS explains why Mac mini, Mac Studio, and iMac owners frequently encounter a baffling error: their Mac reports a city hundreds of miles away in Maps, Weather, or Find My.
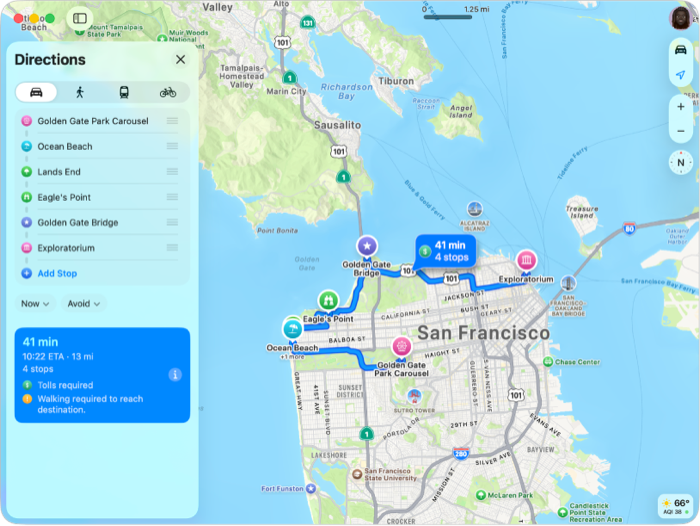
This discrepancy almost always stems from two hardware realities:
-
Wi-Fi is turned off while using Ethernet: Many desktop users rely on a high-speed Ethernet cable and disable Wi-Fi. Without an active Wi-Fi radio, Core Location cannot scan surrounding beacons. Denied beacon data, macOS falls back to your router's public IP address. Commercial GeoIP databases map IP blocks to an Internet Service Provider's central routing station or regional gateway, which can be located three states away.
-
Your router is missing from Apple's database: If you install a brand-new router, move your existing router to a new home, or live in a rural area with few nearby Wi-Fi networks, Apple has no historical coordinates linked to your BSSID. The system again defaults to coarse IP estimation.
Can You Manually Set a Location on Mac
The short answer is no. Apple provides no manual latitude or longitude input field in macOS. Toggling Location Services off does not let you type in your home town; it simply switches your status from an incorrect city to an unknown city.
To establish accurate positioning on a stationary Mac, leave your Wi-Fi interface turned on (even while your internet traffic flows through Ethernet) and ensure an iPhone connected to the same Wi-Fi network uses Location Services. Over time, Apple's database associates your router's beacon with the iPhone's GPS coordinates, correcting your Mac's blue dot automatically.
Fix Location Services on Mac for Maps and Weather
When native apps such as Apple Maps, Weather, Reminders, and Find My display the wrong location, you can resolve the issue or reclaim privacy by adjusting Location Services in macOS.
Fix a Wrong Location on Mac
Before modifying advanced files, run through this practical diagnostic sequence:
Step 1. Turn Wi-Fi on: Click the Wi-Fi icon in your top menu bar and enable it, even if you are connected to an Ethernet cable. Your Mac does not need to drop Ethernet; it only needs the Wi-Fi chip active to listen for nearby beacons.
Step 2. Enable Location Services: Open the Apple Menu () > System Settings > Privacy & Security > Location Services. Ensure the master toggle is switched on, and verify that Maps, Weather, and Find My have permission enabled.
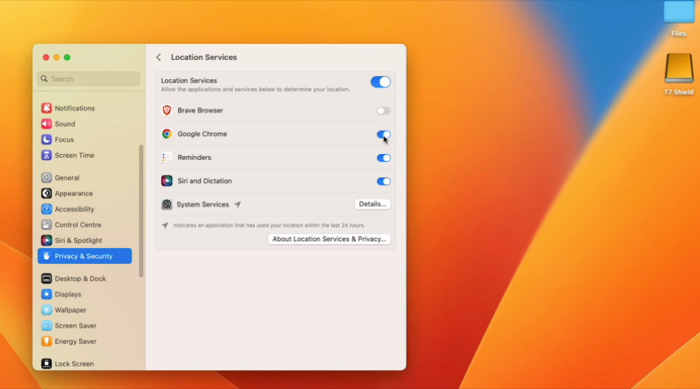
Step 3. Check Significant Locations: Scroll to the bottom of the Location Services app list, click Details next to System Services, and inspect Significant Locations. If your Mac recently moved, cached historical locations can cause coordinate stutter. Click Clear History... to flush stale records.
Step 4. Inspect Menu Bar Indicators: Look for a hollow or solid navigation arrow next to your Control Center icon in the menu bar. Clicking it identifies exactly which application or background daemon is actively querying your coordinates.
Share Your Location from a Mac Instead of an iPhone
Many users want their friends and family in Find My to see their Mac's location rather than their iPhone's, particularly when leaving an iPhone behind during travel or working from a dedicated desk.
Step 1. Launch the Find My app on your Mac.
Step 2. Click the Me tab in the bottom-left corner of the sidebar window.
Step 3. Under the Share My Location section, look for your active device status. Click Use This Mac as My Location.
Once selected, anyone checking your location in Apple's ecosystem will track your Mac's position until you switch it back on your iPhone.
Change Your IP Location on Mac for Websites
Web browsers, online storefronts, and streaming services like Netflix, BBC iPlayer, or YouTube TV do not use Apple Core Location. Instead, they read your incoming public IP address to determine your country and enforce licensing boundaries.
Change Your IP Location on Mac with a VPN

A Virtual Private Network (VPN) creates an encrypted tunnel between your Mac and a remote server located in another city or country. All outbound internet traffic from Safari, Chrome, and desktop applications exits through that server, adopting its IP address.
Step 1. Choose a reputable VPN service with dedicated macOS client software.
Step 2. Open the application and select your desired country or city (for example, Tokyo or London).
Step 3. Click Connect. Once the tunnel is active, verify your new location by visiting an IP checker in your browser.
The "Split Identity" Gotcha: When connected to a VPN, your browser will reflect the VPN server's city, but Apple Maps will still show your physical living room. Because macOS Core Location continues scanning nearby Wi-Fi beacons independently of your network tunnel, native apps remain anchored to your true desk unless you disable Location Services.
Change Location on Mac Without a VPN
If you prefer not to install background VPN software across your entire Mac, two targeted alternatives exist:
Encrypted Onion Routing (Tor Browser): Tor routes your browsing sessions through three decentralized volunteer nodes, wrapping your requests in multi-layered encryption. It effectively conceals your original IP from destination servers without a commercial subscription, though connection latency makes it impractical for 4K video streaming.
HTTP/SOCKS5 Proxies: A proxy reroutes specific application requests through an intermediary server without encrypting underlying data packets. You can configure proxies manually in System Settings > Network > select your interface > Details > Proxies.
Change Network Location on Mac
One of the most confusing naming collisions in macOS is the feature named Network Locations. In Apple terminology, a "Location" is simply a named profile of network interface preferences, not a geographic place on a map.
This tool allows you to save distinct configurations for home, office, and travel environments, switching between static IP assignments, enterprise DNS servers, and network interface priorities without re-entering settings.
Create and Switch Network Locations on Mac
Step 1. Open the Apple Menu () and select System Settings.
Step 2. Click Network in the left sidebar.
Step 3. Click the More pop-up menu (indicated by three dots ...) located below the list of network services on the right, then choose Locations > Edit Locations....
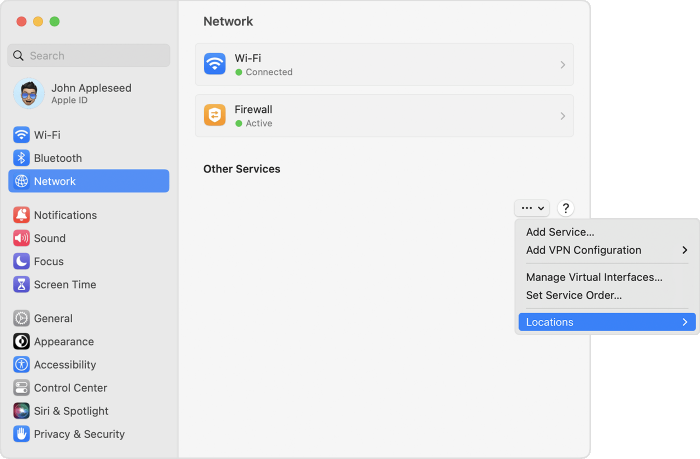
Step 4. Click the Add (+) button, type a descriptive label such as Office Static or Home DNS, and click Done.
Step 5. Select your newly created location from the list. Adjust your Wi-Fi or Ethernet settings (such as entering manual DNS servers or IP addresses). Any modifications will bind exclusively to this profile.
Step 6. To switch environments, return to the three-dot menu, hover over Locations, and choose your preset. Once you have created at least two locations, a convenient Location sub-menu will also appear directly under the main Apple Menu () in your menu bar.
Change the Network Service Order on Mac
If your office provides an Ethernet dock while your home uses Wi-Fi, you can customize service priority per location. Click the three dots, select Set Service Order..., and drag your preferred connection type to the top of the list. macOS will attempt connecting through the topmost active interface first.
Change Region and App Store Country on Mac
If you have permanently relocated to another country or need to access regional software unavailable in your domestic store, Apple requires adjusting your system region or Apple ID account residency.
Change Language and Region on Mac
Changing your system region updates your calendar formats, measurement units (Celsius vs Fahrenheit), primary currency symbols, and default first day of the week.
Step 1. Go to System Settings > General > Language & Region.
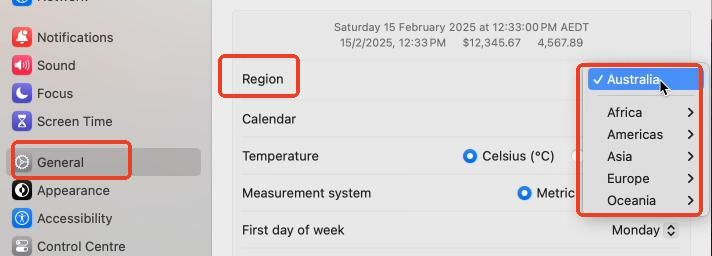
Step 2. Click the Region drop-down menu and choose your target country.
Step 3. Choose whether to adjust your primary system language to match the local tongue, or maintain your preferred display language.
What to Clear Before You Change App Store Country on Mac
Unlike basic system region changes, switching your App Store country alters your commercial account standing with Apple. Before Apple's servers permit the change, you must clear three strict account criteria:
-
Zero Apple Account Balance: Your account store credit must be exactly $0.00. If you have remaining credit lower than the cost of a single item, contact Apple Support to forfeit the remaining balance.
-
Cancel Active Subscriptions: Any active recurring subscriptions—including Apple One, iCloud+, Apple Music, or third-party in-app purchases—must be canceled and allowed to expire fully.
-
Valid Local Payment Method: You must possess a credit card, debit card, or verified regional payment mechanism registered to a valid residential billing address in the new country.
Change Your App Store Region on Mac
Step 1. Launch the App Store application on your Mac.
Step 2. Click your name or account profile picture in the bottom-left corner.
Step 3. Click Account Settings in the top-right corner of the window.

Step 4. In the Account Information overview, click Change Country or Region.
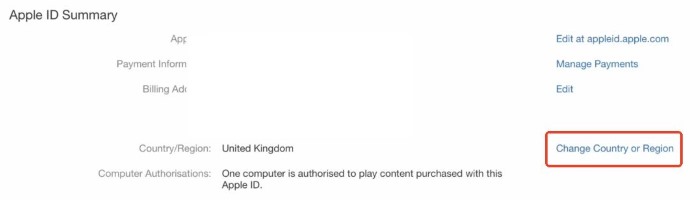
Step 5. Select your new destination, review the local terms, and submit your valid payment credentials and billing address.
Practical Tip: If you only need to download a single country-specific application (such as a foreign banking client or local transit pass), avoid changing your primary Apple ID. It is far simpler to register a secondary, free Apple ID configured to the target country without attaching payment methods, allowing you to sign in, download the app, and sign back into your primary account.
Simulate a GPS Location from Your Mac
Spoofing coordinates from a Mac usually comes down to two different jobs: testing how a website responds to a specific city in your browser, or overriding GPS on a phone plugged into your Mac.
Simulate a Website Location in Chrome on Mac
If you are testing how an interactive website reacts to visitors in London, Sydney, or San Francisco, you do not need system-level hacks or a VPN. You can inject exact coordinates directly into Chromium-based browsers:
Step 1. Open Google Chrome or Microsoft Edge and press Command + Option + I to open Developer Tools.
Step 2. Press Command + Shift + P to launch the command menu, type Sensors, and select Show Sensors.
Step 3. Under the Location dropdown in the bottom panel, choose a major metropolitan preset (such as London, Tokyo, or San Francisco), or select Other... and input custom latitude, longitude, and timezone values.
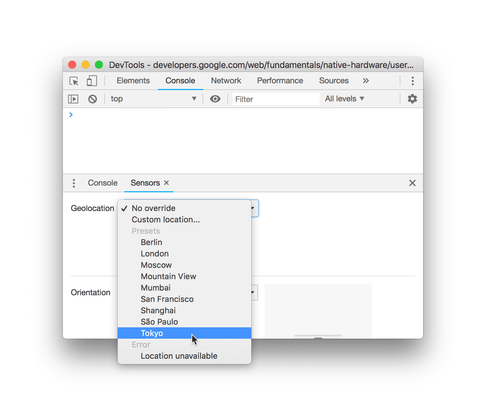
Any webpage querying the standard HTML5 Geolocation API (navigator.geolocation) in that browser tab will receive your overridden coordinates while leaving your Mac's operating system untouched.
Change iPhone or Android GPS from a Mac
Simulating true GPS on an iPhone or Android device directly from a phone screen is restricted by mobile operating systems, frequently requiring dangerous root exploits or jailbreaks. However, Apple and Google maintain official developer bridges over USB that allow tethered computers to simulate motion paths for diagnostic testing.
PoKeep Location Changer harnesses this desktop-to-mobile bridge. It installs on your macOS desktop and controls the global GPS coordinates of a connected smartphone over a secure cable or local Wi-Fi pairing.


How the tethered setup operates:
Step 1. Launch PoKeep Location Changer on your Mac and connect your iPhone or Android device with a certified USB cable.

Step 2. On modern iOS releases, follow the prompt to enable Developer Mode under Settings > Privacy & Security, then let the Mac complete the driver handshake.
Step 3. An interactive map displays your phone's real-time position on your Mac monitor.

Teleport Mode: Search for any address or coordinate pair worldwide and click Move to reposition your phone instantly.
Joystick & Route Simulation: Navigate virtual streets using your Mac's keyboard (W/A/S/D keys) or plan natural walking routes with adjustable speeds, keeping your phone's native file system completely unmodified.
Which Change Actually Moves Your Location on Mac
Because macOS splits location into distinct operational layers, choose the specific solution that targets your actual task:
| What You Want to Change | What macOS Controls | The Practical Solution |
|---|---|---|
| Fix wrong city in Maps, Weather, or Find My | Core Location (Wi-Fi beacons) | Keep Wi-Fi turned on; clear Significant Locations history |
| Access geo-restricted websites or streaming | Public IP Address | Use a Mac VPN, Tor Browser, or encrypted proxy |
| Switch network configs between home and work | Network Settings Profiles | System Settings > Network > Locations > Edit Locations |
| Download foreign Mac or iOS apps | Apple ID Billing Residency | App Store Account Settings (or create secondary Apple ID) |
| Change date formats, currency, and units | System Regional Formats | System Settings > General > Language & Region |
| Test geolocation on a specific website | HTML5 Geolocation API | Chrome DevTools > Sensors > Custom Coordinates |
| Simulate GPS for phone games or social apps | Mobile Device GPS | Connect phone to Mac using PoKeep Location Changer |
Change Location on Mac FAQ
Why does my Mac think I am in another state when I connect via Ethernet?
Desktop Macs rely on nearby Wi-Fi network beacon scanning to calculate physical coordinates. If you use an Ethernet cable and disable your Wi-Fi interface, macOS cannot detect surrounding routers and falls back to GeoIP lookup on your public IP address. Your internet provider's central routing hub is often located dozens or hundreds of miles away. Leaving Wi-Fi turned on while staying on Ethernet resolves the issue.
Can I manually set custom GPS coordinates in macOS System Settings?
No. Apple provides no coordinate input box anywhere in macOS. Geographic positioning is calculated automatically by background Core Location frameworks. If you need custom coordinates for web testing, use Chrome's Sensors tool. If you need to simulate GPS coordinates on a connected mobile device, use desktop location changer software.
Will a VPN change my location in Apple Maps and Find My on Mac?
In most cases, no. A VPN alters your public IP address, masking your whereabouts from websites and streaming providers. However, native macOS apps like Apple Maps and Find My query Core Location, which relies on nearby Wi-Fi beacons. As long as your Wi-Fi card is enabled, Apple Maps will continue showing your true physical position.
How do I share my location from my Mac instead of my iPhone in Find My?
Open the Find My app on your Mac, click the Me tab in the bottom-left corner of the sidebar, and select Use This Mac as My Location under the Share My Location section.
Does creating a Network Location in macOS change my geographic position?
No. In Apple terminology, a Network Location is merely a saved preset of network settings, such as manual IP addresses, custom DNS configurations, and interface rankings. It allows quick toggling between home and office network rules, but it does not alter your physical coordinates or your public IP address.


 Leave Your Comment